 The UniFi Controller has no UI configuration to assign an additional IP for the UniFi Security Gateway (USG). Hopefully this will be added from Ubiquiti in the future.
Date: 25.12.2017
Controller Version: 5.6.26
Firmware: 4.4.12.5032482
After many hours of reading, try and error I was able to solve this task. This guide is focused on people with network basics, therefore I will not cover technically explanations.
UPDATE: Important, set only the values for the second IP inside config.gateway.json the settings like Port Forwarding for the first IP have to configured on the webinterface.
Attention: After following this guide you will see the first IP inside the USG Overview/Details pane and the second IP inside the Config pane in the webinterface. This looks like a bug UniFi Controller which can be ignored.
Goal:
NAT Public IP 10.0.0.2 on Port 80/TCP to internal server 192.168.0.2 on Port 8080/TCP.

Solution:
Overview:
- Test if the Port is closed
- Add the additional IP to the gateway
- Create a DNAT rule from WAN to LAN
- Create a SNAT rule from LAN to WAN
- Create a Firewall rule to allow traffic from WAN to LAN
- Apply changes
- Test if the Port is now open
NOTE: You can also add this with CLI commands but it will not persist after changes made from the Web-Interface.
Step 1
Test with NMAP from WAN/Internet
nmap -n -Pn -p 80 10.0.0.2
If this Port is open you should check your network setup because something is responding to 80/TCP and the next steps will potentially lead to undesired results.
Step 2-4
We need to create or append config.gateway.json inside the UniFi Controller. Place this file inside the site configuration, e.g. for the default page but the file inside “data/sites/default”
Content of config.gateway.json:
{
    "interfaces": {
        "ethernet": {
            "eth0": {
                "address": [
                    "10.0.0.1/29",
                    "10.0.0.2/29"
                ],
                "firewall": {
                    "in": {
                        "name": "WAN_IN"
                    },
                    "local": {
                        "name": "WAN_LOCAL"
                    },
                    "out": {
                        "name": "WAN_OUT"
                    }
                }
            }
        }
    },
    "service": {
        "nat": {
            "rule": {
                "3000": {
                    "description": "DNAT 10.0.0.2 TCP/8080 to 192.168.0.2",
                    "destination": {
                        "address": "10.0.0.2",
                        "port": "80"
                    },
                    "inbound-interface": "eth0",
                    "inside-address": {
                        "address": "192.168.0.2",
                        "port": "8080"
                    },
                    "log": "enable",
                    "protocol": "tcp",
                    "type": "destination"
                },
                "5000": {
                    "description": "SNAT 192.168.0.2 TCP/8080 to 10.0.0.2",
                    "log": "enable",
                    "outbound-interface": "eth0",
                    "outside-address": {
                        "address": "10.0.0.2",
                        "port": "80"
                    },
                    "protocol": "tcp",
                    "source": {
                        "address": "192.168.0.2",
                        "port": "8080"
                    },
                    "type": "source"
                }
            }
        }
    },
    "firewall": {
        "name": {
            "WAN_IN": {
                "default-action": "drop",
                "rule": {
                    "1000": {
                        "action": "accept",
                        "description": "NAT 10.0.0.2 TCP/8080 to 192.168.0.2",
                        "destination": {
                            "address": "192.168.0.2",
                            "port": "8080"
                        },
                        "log": "enable",
                        "protocol": "tcp"
                    },
                }
            }
        }
    }
}
Step 5
Now it’s time to apply these rules to the USG. To do this log in to your UniFi Controller and force provisioning
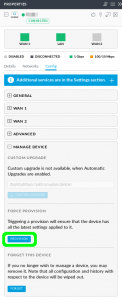 Step 6

Test with NMAP from WAN/Internet
nmap -n -Pn -p 80 10.0.0.2
Hi,
can u help me out, what if a got two NAS Server in the background and I can reach each with a separate public IP, but when I configure ddns at the NAS, just on will work and the 2nd will route me if I am inside the lan always to the gateway? best
PS: Great Post!
We solved this problem yesterday in a remote session. The additional notes where added to the article.
Hairpin NAT isn’t specified here. Any examples?